
January 28, 2021
Wasmer Python embedding 1.0
Announcing the immediate availability of the Wasmer Python embedding 1.0 version!
Syrus Akamin
Founder & CEO
After the release of Wasmer 1.0, we are thrilled to announce the immediate availability of the Wasmer Python embedding 1.0 version.
Time flies! It’s been a little bit less than 2 years since we first
released wasmer, the Wasmer embedding for Python. Thanks to a
vibrant and awesome community, this project has been greatly welcomed!
After 1.8 million installations in the wild, it’s our great pleasure
to introduce the 1.0 version with a stable API, lightning
performances, cross-compilation, three compilers, two engines, and
many more advanced features. Let’s dig in!
- Light by default
- Pick your best compiler on the fly
- Improved and simplified API
- Faster memory operations
- Cross-compilation
- WASI
- Ready to use on major platforms and architectures
- Documentation and examples
- Discovering compiler capabilities with a benchmark
- Conclusion
Light by default
By default, the
wasmer
package comes as light as possible, the rest are opt-in
features. wasmer provides by default:
- the entire Wasmer runtime,
- 2 headless engines.
What’s an engine? An engine is responsible to drive the
compilation from a WebAssembly module to executable code, and the
execution of this executable code. Note that the engine is also
responsible to store the executable code somewhere, along with
serializing and deserializing it when caching the compilation
result. The Wasmer Python embedding comes with the JIT engine
(wasmer.engine.JIT, the default) and the Native engine
(wasmer.engine.Native).
In a nutshell, the JIT engine stores the executable code in memory,
whilst the Native engine stores the executable code in a native shared
library object (.so, .dylib or .dll files depending on the
Operating System where it runs).
Because the wasmer package comes with zero compilers, the engines
are said headless. In other words, the engines aren’t able to
compile, they can only execute an already-compiled WebAssembly module.
Why headless engines are the default? Because it’s super light, and
it’s the common path. The wasmer wheel is around 1.5Mb without the
compilers, or around 15Mb with all of them. It obviously impacts the
startup time, and the required space in memory. It also makes it
possible to fit wasmer in very small boards (thinking of the
Internet of Things). Or more basically, it speeds up installation and
setup. See a graph below comparing all the wheel sizes.
Pick your best compiler on the fly
As we said in the previous section, the wasmer package comes with
headless engines. What if we want to compile a WebAssembly module to
executable code? Then we need to install a compiler. We provide 3 of
them as standalone packages:
wasmer-compiler-singlepass, the Singlepass compiler provides a super fast compilation time, and a slower execution time. It is not prone to JIT-bombs. It’s ideal for blockchains.wasmer-compiler-cranelift, the Cranelift compiler provides a fast compilation time, and a fast execution time. It’s ideal for development.wasmer-compiler-llvm, the LLVM compiler provides a slow compilation time, but a very fast execution time, close to native. It’s ideal for production.
An example is worth a thousand words.
# Import types from the `wasmer` package.
# Also import one compiler, here Cranelift.
from wasmer import engine, Store, Module, Instance
from wasmer_compiler_cranelift import Compiler

# Let's define the store, that holds the engine, that holds the compiler.
store = Store(engine.JIT(Compiler))

# Let's compile and instantiate the module.
module = Module(store, open('my_program.wasm', 'rb').read())
instance = Instance(module)

# Call the exported `sum` function naturally.
result = instance.exports.sum(5, 37)

assert result == 42
Notice how everything fits together nicely. Now let’s imagine we have serialized the compiled module into a file as such:
serialized_module_file.write(module.serialize())
One can simply execute the WebAssembly compiled-module with no compiler, only with a headless engine as follows:
# Import types from the `wasmer` package.
from wasmer import engine, Store, Instance, Module

store = Store(engine.JIT()) # we don't pass a compiler!

# Deserialize the compiled WebAssembly module, and instantiate it.
module = Module.deserialize(store, serialized_module_file.read())
instance = Instance(module)

result = instance.exports.sum(1, 2)

assert result == 3
Et voilà ! It works with no compiler this time.
We believe that this flexibility is a game changer since it can address everyone’s needs while keeping the Wasmer runtime light and fast.
LLVM infrastructure just for you, pypi
A (funny?) side note we wanted to share. We did write, from scratch, an entire build system to produce custom LLVM builds specifically designed for pypi. Indeed, the default LLVM pre-builts provided by the LLVM project themselves aren’t compatible with pypi binary wheels policy. The most geeky of you might want to take a look at it: it’s really simple but so useful. Feel free to fork the project.
Wheel size
A wheel is a Python package. It’s what a user downloads and installs
when running pip install wasmer for example.
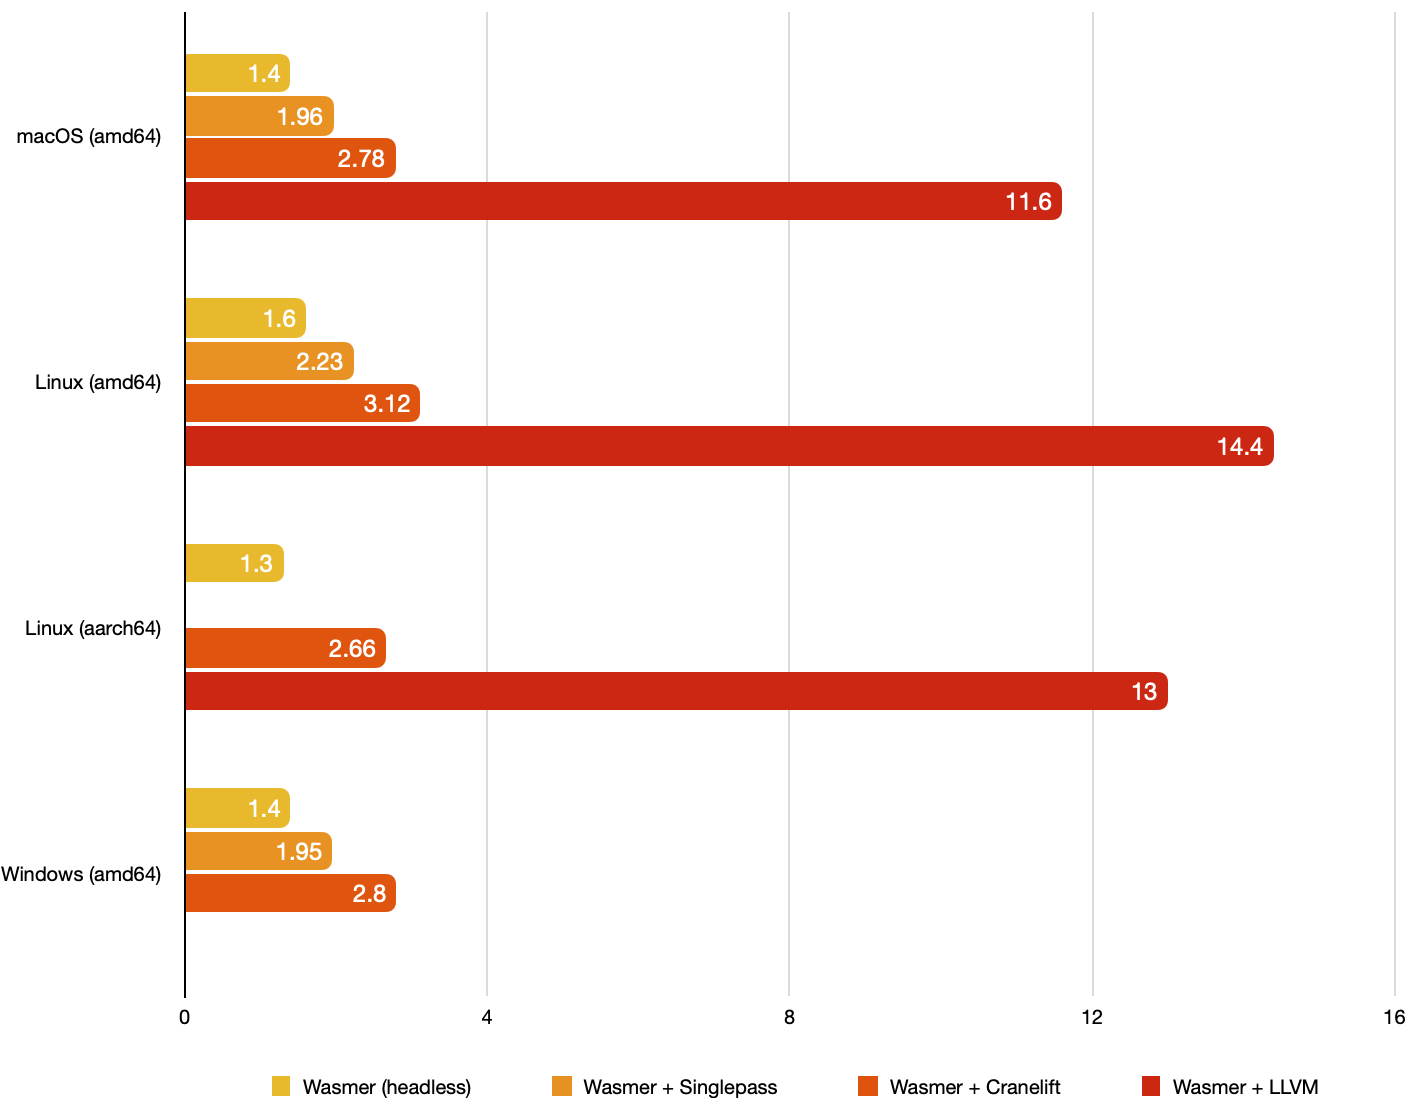
We thought it would be interesting to see how light the wheels are now. To do that, we have fetch the size of the:
wasmerwheel alone (with headless engines),wasmer+wasmer-compiler-singlepasswheels,wasmer+wasmer-compiler-craneliftwheels,wasmer+wasmer-compiler-llvmwheels.
We have computed those sizes for 3 platforms (macOS, Linux, and
Windows) and 2 architectures (amd64 and aarch64). (On Linux
aarch64, the wasmer-compiler-singlepass wheel is missing because
it does not support (yet) aarch64. On Windows amd64, the
wasmer-compiler-llvm wheel is missing due to a temporary issue, it
should be fixed quickly.)
The results are presented in the following graph:

On average, the wasmer wheel has a size of 1.4Mb; the wasmer +
wasmer-compiler-singlepass wheels have a size of 2Mb; the
wasmer + wasmer-compiler-cranelift wheels have a size of 2.8Mb;
the wasmer + wasmer-compiler-llvm wheels have a size of 13Mb.
Improved and simplified API
Between the 0.4 and the 1.0 version, we have rewritten the entire project with a new, improved API. The new API is as close as possible to the Wasmer runtime API (the original one, written in Rust), so that it reduces the cognitive effort for new users to switch from one project to another.
All the WebAssembly externals are now supported, which includes
Function, Global, Memory, and Table. All of them can be used
as imports or as exports. Well, this is now straighforward.
To simplify the declaration of imports, we provide an ImportObject
API. It works as follows:
from wasmer import engine, wat2wasm, Store, Module, ImportObject, Function, FunctionType, Type, Instance
from wasmer_compiler_cranelift import Compiler

# Let's declare the Wasm module with the text representation.
# If this module was written in Rust, it would have been:
#
# ```rs
# extern "C" {
#     fn sum(x: i32, y: i32) -> i32;
# }
#
# #[no_mangle]
# pub extern "C" fn add_one(x: i32) -> i32 {
#     unsafe { sum(x, 1) }
# }
# ```
wasm_bytes = wat2wasm(
    """
    (module
      (import "env" "sum" (func $sum (param i32 i32) (result i32)))
      (func (export "add_one") (param $x i32) (result i32)
        local.get $x
        i32.const 1
        call $sum))
    """
)

# Create a store.
store = Store(engine.JIT(Compiler))

# Let's compile the WebAssembly module.
module = Module(store, wasm_bytes)

# When creating an `Instance`, we can pass an `ImportObject`. All
# entities that must be imported are registered inside the
# `ImportObject`.
import_object = ImportObject()

# Let's write the Python function that is going to be imported,
# i.e. called by the WebAssembly module.
def sum(x: int, y: int) -> int:
    return x + y

# The type of `sum` is infered from the Python declaration.
# It can be specified as the third argument of `Function`
# otherwise (see the documentation).
sum_host_function = Function(store, sum)

# Now let's register the `sum` import inside the `env` namespace.
import_object.register(
    "env",
    {
        "sum": sum_host_function,
    }
)

# Let's instantiate the module!
instance = Instance(module, import_object)

# And finally, call the `add_one` exported function!
assert instance.exports.add_one(41) == 42
Again, this is straighforward and brings no surprise. This is one new feature amongst many others.
Faster memory operations
The Memory class (which represents an imported or an exported
memory) provided views, which were classes like Uint8View,
Int8View, etc. up to Int32View, through the memory.uint8_view()
method and siblings. These view classes were useful to read from and
write into a WebAssembly memory. Even if those operations weren’t
slow, they could be faster. Let’s introduce Buffer! A buffer is
generated by the memory.buffer getter. It implements the Python
buffer protocol, so it
is possible to read and write bytes with the
bytes,
bytearray,
or
memoryview
standard functions.
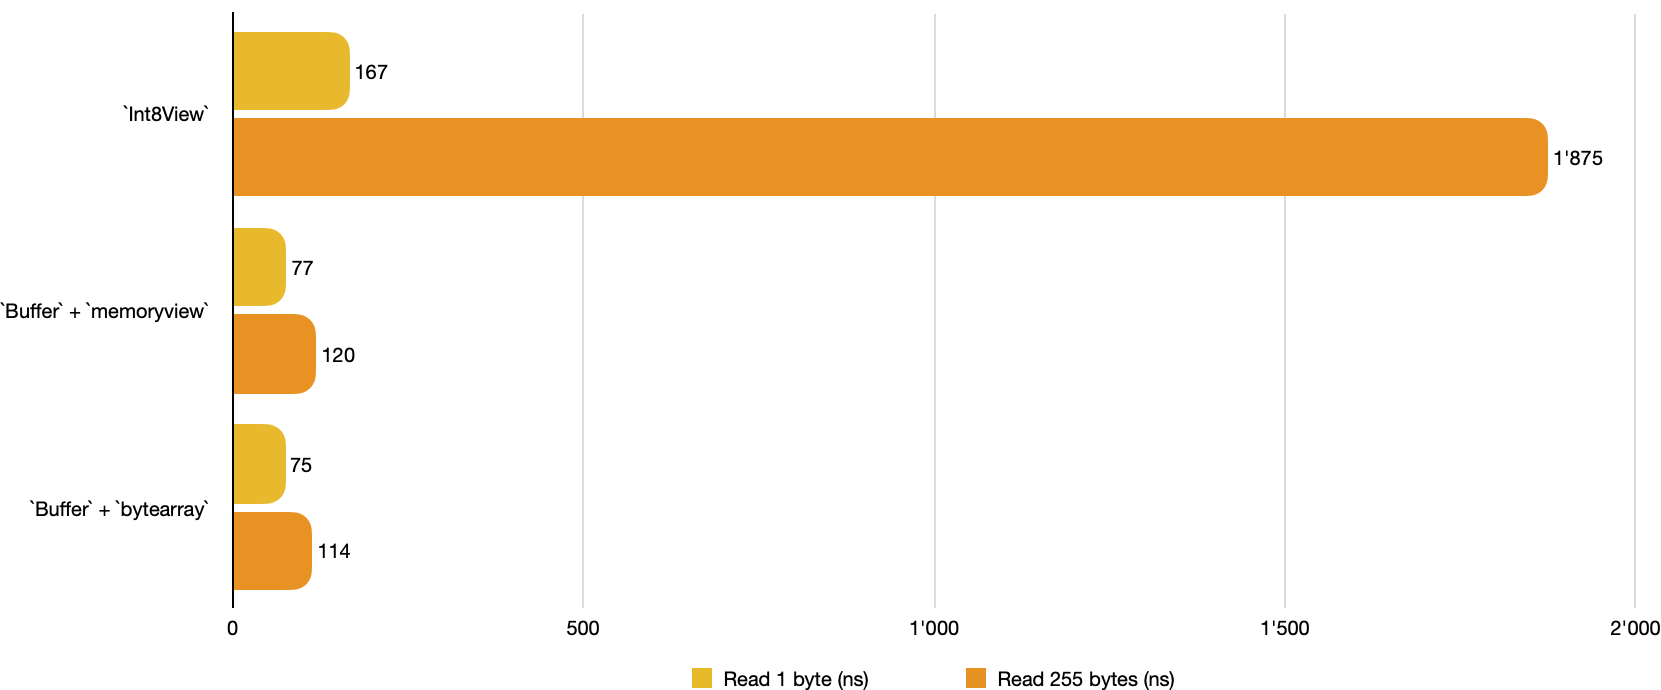
Here is quick benchmark to show how the Buffer improves performance
when reading 1 and 255 bytes from memory (the lower the better):

When reading 1 byte, views are 2 times slower than Buffer with
memoryview or bytearray. When reading 255 bytes, views are 16
times slower than Buffer. We consider this result as a
non-negligible improvement.
Cross-compilation
The compilers come with a great feature: They support
cross-compilation. It means that from an amd64 (x86_64), we can
compile for an aarch64 (ARM64) machine, or from Linux to macOS
etc. For example:
from wasmer import engine, target, Store, Module

# Let's define the target “triple”. Historically, such things had
# three fields, though additional fields have been added over time.
triple = target.Triple('x86_64-linux-musl')

# Let's define the CPU features.
cpu_features = target.CpuFeatures()
cpu_features.add('sse2')

# Let's build the target!
target = target.Target(triple, cpu_features)

# And now, let's define the store with its engine.
store = Store(engine.JIT(Compiler, target))

# Finally, compile the WebAssembly module for this target.
module = Module(store, wasm_byte)

assert isinstance(module, Module)
What’s next? Serialize and send your WebAssembly compiled module on its host mate, where a potentially Wasmer with headless engines is waiting despairingly.
We believe that cross-compilation will help users to pre-compile their WebAssembly modules on a robust dedicated machine, and then deploy them in various environments like a breath.
WASI
The wasmer package now features WASI (The
WebAssembly System Interface), with all the snapshot previews;
understand, all the versions.
Basically, the wasi sub-package helps to configure an ImportObject
object that is passed to Instance. Let’s see how it works with an
example. We want to execute this Rust
program,
that prints its arguments, its environment variables, and that lists
the content of its current working directory.
from wasmer import engine, wasi, Store, Module, ImportObject, Instance
from wasmer_compiler_cranelift import Compiler

# As usual, let's fetch some bytes and compile the module.
wasm_bytes = open('wasi.wasm', 'rb').read()
store = Store(engine.JIT(Compiler))
module = Module(store, wasm_bytes)

# First, let's extract the WASI version from the module. Why? Because
# WASI exists in multiple versions, and it doesn't work the
# same way. So, to ensure compatibility, we need to know the version.
wasi_version = wasi.get_version(module, strict=True)

# Second, create a `wasi.Environment`. It contains everything related
# to WASI. To build such an environment, we must use the
# `wasi.StateBuilder`.
#
# In this case, we specify the program name: `wasi_test_program`. We
# also specify the program is invoked with the `--test` argument, in
# addition to two environment variables: `COLOR` and
# `APP_SHOULD_LOG`. Finally, we map the `the_host_current_dir` to the
# current directory. There it is:
wasi_env =
    wasi.StateBuilder('wasi_test_program'). \
        argument('--test'). \
        environment('COLOR', 'true'). \
        environment('APP_SHOULD_LOG', 'false'). \
        map_directory('the_host_current_dir', '.'). \
        finalize()

# From the WASI environment, we generate a custom import object. Why?
# Because WASI is, from the user perspective, a bunch of
# imports. Consequently `generate_import_object`… generates a
# pre-configured import object.
#
# Do you remember when we said WASI has multiple versions? Well, we
# need the WASI version here!
import_object = wasi_env.generate_import_object(store, wasi_version)

# Now we can instantiate the module.
instance = Instance(module, import_object)

# The entry point for a WASI WebAssembly module is a function named
# `_start`. Let's call it and see what happens!
instance.exports._start()
This program aboves prints the following data on stdout:
Found program name: `wasi_test_program`
Found 1 arguments: --test
Found 2 environment variables: COLOR=true, APP_SHOULD_LOG=false
Found 1 preopened directories: DirEntry("/the_host_current_dir")
3 instructions and WASI is configured, neat!
Ready to use on major platforms and architectures
One of the promises of WebAssembly is its universality. By design, it aims at being run anywhere.
To fulfill this promise, we provide more than 57 wheels for various
platforms and architectures, including Linux, Darwin (macOS) and
Windows, and amd64 (Intel) along with aarch64 (ARM). All our
packages work with Python 3.6 up to 3.9.
Documentation and examples
We take pride in making our projects really polished. As we did with the previous releases, we spent a lot of time polishing the user experience.
We have written extensive documentation for our users. It contains more than 50 examples, all of them illustrating how to use specific functions or classes. We focused on providing comfortable navigation in documentation for beginners, with hints and useful links. All the examples can be copy-pasted into a Python shell, and they will all work as is.
In addition to this documentation, we provide a set of more detailed examples. A document lists and explains all of them. One can search by keywords to find appropriate examples faster. Every example is extensively documented to explain every detail to the user.
We believe this kind of documentation and examples will help users to get onboard and be familiar with WebAssembly more quickly.
Discovering compiler capabilities with a benchmark
Designing benchmarks is hard, so we designed a benchmark that only shows why we provide multiple compilers and engines. The benchmark illustrates how the compilers address different needs when the balance between compilation-time or execution-time varies.
Because benchmarks are not our best way to party, we tried to make
them fun. The idea is to execute JavaScript inside Python, via
wasmer and QuickJS compiled
as a WebAssembly module
(qjs.wasm). We don’t execute
something fancy, just console.log('hello'). Because too much fun is
not always good.
Benchmarks are run inside an Ubuntu virtual machine, with 4 CPU cores and 4Gb of memory; the host has an Intel Xeon CPU (3.10Ghz). It’s not really important for what we are going to illustrate.
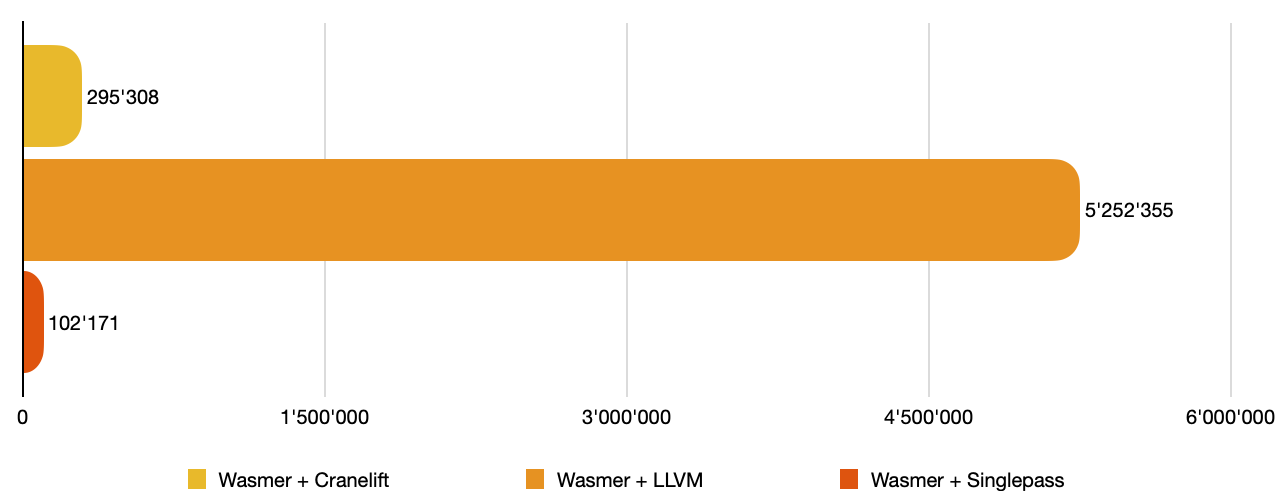
So first, let’s compile the 2.4Mb qjs.wasm WebAssembly module with
our Singlepass, Cranelift and LLVM compilers. Times are given in
microseconds (μs).

Module with the JIT engine + the
Cranelift, LLVM and Singlepass compilers (in μs).The results are the following. wasmer with the Singlepass compiler
is the fastest to compile qjs.wasm in 102ms. wasmer with the
Cranelift compiler is the second in 295ms. Finally wasmer with the
LLVM compiler in 5252ms (5sec).
We can’t conclude anything based on that, except that if a compiler takes time, it’s likely because it optimises the generated code heavily, which could mean that the execution time will be improved.
Because it’s expensive to compile a module into executable code, we
want to cache it. And compilation should ideally be always done
once. So let’s measure how long it takes to get a Module from a
pre-compiled WebAssembly module. We want to see if there is a
difference between a module that has been compiled with the
Singlepass, Cranelift or LLVM compiler. We are going to use a headless
engine here, so the wasmer package alone with no compiler.

Module with the JIT headless
engine (module is pre-compiled) (in μs).The results are the following. wasmer with the LLVM compiler is the
fastest to rebuild a Module from a pre-compiled module in 9.8ms,
following by — head-to-head — wasmer with the Cranelift and the
Singlepass compilers in 11.5ms.
That result is interesting. LLVM is the slower compiler to compile a WebAssembly module, but once compiled it’s faster to load the module! That’s a good news.
Take a breath. Up to now, we have successfully compiled qjs.wasm to
executable code. So let’s use it! As we said, we are going to execute
console.log('hello'). It requires WASI, so it’s a nice real-world
test. Let’s see how they perform.

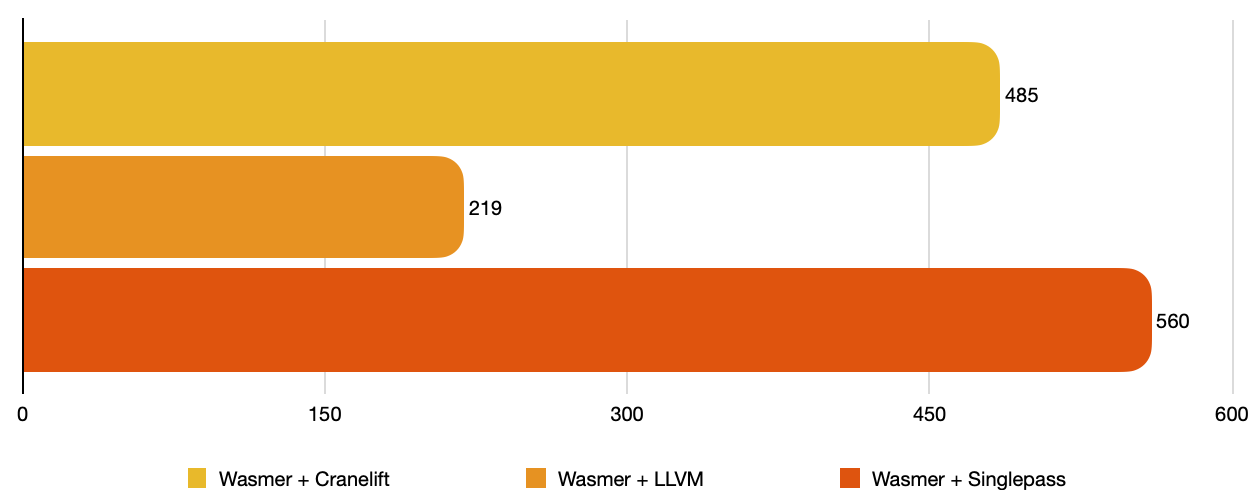
console.log("hello") with
qjs.wasm, compiled with the Cranelift, LLVM and
Singlepass compilers (in μs).First, wasmer is successfully able to print hello on the standard
output. This string was printed by JavaScript, through WebAssembly,
inside Python. How fun is that :-)?
Second, we see interesting results. wasmer with the LLVM compiler is
by far the faster to execute qjs.wasm. It was compile-time well
spent! It prints hello in JavaScript in 0.219ms. wasmer with the
Cranelift compiler prints hello in 0.485ms. Finally, wasmer with
the Singlepass compiler prints hello in 0.560ms. It’s very likely
that a more computation intensive test would uncover the difference
between Cranelift and Singlepass deeper.
This benchmark confirms what we said earlier:
- The Singlepass compiler provides a fast compilation but a slower execution, which can be perfect for small/simple WebAssembly modules,
- The Cranelift compiler provides a good balance between compilation and execution time,
- The LLVM compiler provides a slow but optimised compilation, and a very fast execution, which is perfect for complex WebAssembly modules.
The fact that wasmer comes with headless engines (with no compiler)
is helpful, as rebuilding a Module from a pre-compiled module is
really useful.
In the case of wasmer with an already pre-compiled module with the
LLVM compiler, it takes 9.8ms for the full startup + 0.2ms for the
execution, for a total of 10ms to print hello.
Conclusion
The 1.0 version testifies of an API and features stability and
maturity. We believe that the new design with the two headless
engines, and the compilers as standalone packages, is a great
improvement and provides more flexibility. It allows installing
wasmer in more devices.
With the help of the new cross-compilation API, we believe that it’s easier than ever to execute WebAssembly anywhere.
Performance has been improved. WASI is now supported, up to the latest
version (up to wasi_snapshot_preview1 at the time of writing).
Documentation and examples have been meticulously written to help users new to WebAssembly, or to help advanced users. We believe it will facilitate the usage of WebAssembly in the Python ecosystem.
What’s next?
Nonetheless, the wasmer Python package does not cover all the latest
WebAssembly features (for example, the multi-value
proposal is implemented,
but the reference type
proposal is still
under implementation). Be reassured though, it’s very likely that your
usual compiler (like rustc) does not support those in-progress
proposals yet, so it’s not a blocker. But we still have work!
Test it!
The packages are available on pypi:
Wheels for aarch64 aren’t published on pypi (because it doesn’t
fulfill the manylinux2010 policy regarding binary wheels, see the
PEP
571). They
are freely downloadable from the Github
release.
Join a community of more than 1000 Python and WebAssembly passionate developers!
About the Author
Syrus Akbary is an enterpreneur and programmer. Specifically known for his contributions to the field of WebAssembly. He is the Founder and CEO of Wasmer, an innovative company that focuses on creating developer tools and infrastructure for running Wasm
Syrus Akamin
Founder & CEO
Light by default
Pick your best compiler on the fly
Import types from the `wasmer` package.
Also import one compiler, here Cranelift.
Let's define the store, that holds the engine, that holds the compiler.
Let's compile and instantiate the module.
Call the exported `sum` function naturally.
Import types from the `wasmer` package.
Deserialize the compiled WebAssembly module, and instantiate it.
LLVM infrastructure just for you, pypi
Wheel size
Improved and simplified API
Let's declare the Wasm module with the text representation.
If this module was written in Rust, it would have been:
```rs
extern "C" {
fn sum(x: i32, y: i32) -> i32;
}
#[no_mangle]
pub extern "C" fn add_one(x: i32) -> i32 {
unsafe { sum(x, 1) }
}
```
Create a store.
Let's compile the WebAssembly module.
When creating an `Instance`, we can pass an `ImportObject`. All
entities that must be imported are registered inside the
`ImportObject`.
Let's write the Python function that is going to be imported,
i.e. called by the WebAssembly module.
The type of `sum` is infered from the Python declaration.
It can be specified as the third argument of `Function`
otherwise (see the documentation).
Now let's register the `sum` import inside the `env` namespace.
Let's instantiate the module!
And finally, call the `add_one` exported function!
Faster memory operations
Cross-compilation
Let's define the target “triple”. Historically, such things had
three fields, though additional fields have been added over time.
Let's define the CPU features.
Let's build the target!
And now, let's define the store with its engine.
Finally, compile the WebAssembly module for this target.
WASI
As usual, let's fetch some bytes and compile the module.
First, let's extract the WASI version from the module. Why? Because
WASI exists in multiple versions, and it doesn't work the
same way. So, to ensure compatibility, we need to know the version.
Second, create a `wasi.Environment`. It contains everything related
to WASI. To build such an environment, we must use the
`wasi.StateBuilder`.
In this case, we specify the program name: `wasi_test_program`. We
also specify the program is invoked with the `--test` argument, in
addition to two environment variables: `COLOR` and
`APP_SHOULD_LOG`. Finally, we map the `the_host_current_dir` to the
current directory. There it is:
From the WASI environment, we generate a custom import object. Why?
Because WASI is, from the user perspective, a bunch of
imports. Consequently `generate_import_object`… generates a
pre-configured import object.
Do you remember when we said WASI has multiple versions? Well, we
need the WASI version here!
Now we can instantiate the module.
The entry point for a WASI WebAssembly module is a function named
`_start`. Let's call it and see what happens!
Ready to use on major platforms and architectures
Documentation and examples
Discovering compiler capabilities with a benchmark
Conclusion
What’s next?
Test it!
Deploy your first Python site in seconds with our managed cloud solution.
Read more
engineeringwasmer runtimewasmerruntimeperformance
Improving WebAssembly load times with Zero-Copy deserialization
Arshia GhafooriSeptember 7, 2023
wapmengineeringregistry
Introducing Markdown Playgrounds - Powered by WebAssembly
Syrus AkaminApril 22, 2022
edgepython
Python on the Edge: Fast, sandboxed, and powered by WebAssembly
Syrus AkaminSeptember 24, 2025